
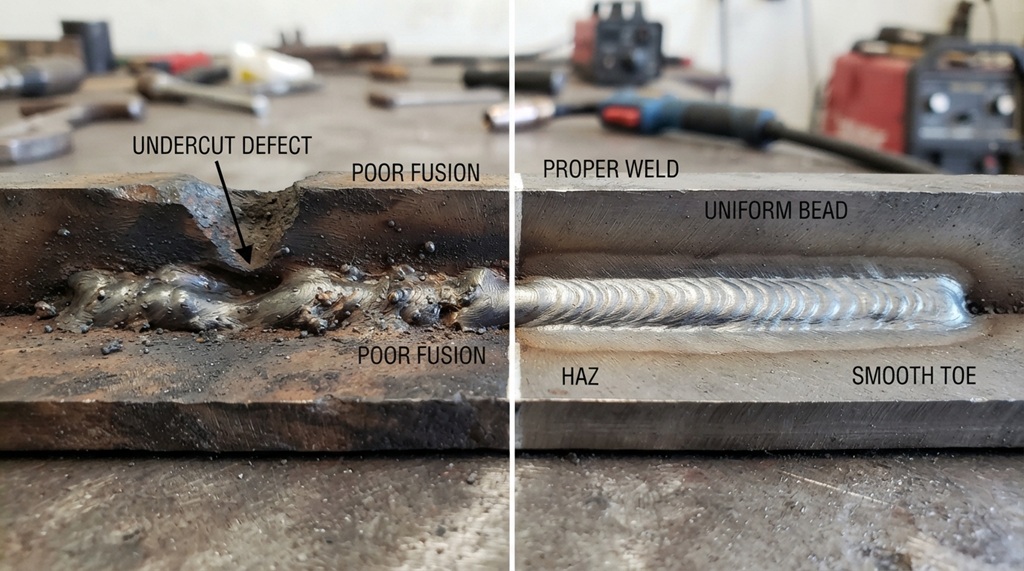
Weld bead undercut is a groove that forms along the edge of a weld, where the base metal melts away but filler metal doesn’t fully fill it back in. You fix it by grinding out the defect, adjusting your amperage and travel speed, then re-running a stringer bead to rebuild the lost material. Left alone, undercut creates a stress riser that can crack under load and fail inspection.
Most welders run into undercut at some point. It shows up more often on fillet welds, vertical passes, and jobs where the amperage is too hot for the joint. The good news: undercut is almost always fixable, and once you understand why it forms, you can stop chasing the same mistake on every project.
This guide walks through what causes undercut, how to repair it correctly, and the technique adjustments that keep it from coming back.
What Causes Weld Bead Undercut
Undercut happens when your arc melts more base metal than your filler can replace, leaving a notch at the toe of the weld. Four factors drive this: too much heat, travel speed that’s too fast, poor arc angle, and excessive weave width.
Excess Amperage or Voltage
Too much heat digs a deeper crater at the weld’s edge than the puddle can refill. This is the single most common cause of undercut in stick and MIG welding alike. If your machine settings look right on paper but undercut keeps appearing, drop your amperage by 10-15% and test again on scrap.
Travel Speed Too Fast
A puddle needs time to flow into the melted edge before you move past it. When you travel too quickly, the arc melts the base metal but the bead doesn’t catch up, so the groove stays open. Slowing down, even slightly, gives the puddle a chance to wash back into the toe.
Incorrect Arc Angle
Pointing the electrode too far toward one plate pushes heat unevenly into the joint. This blows out the edge on one side while starving the other of fusion. A neutral or slightly trailing angle spreads heat more evenly across both members of the joint.
Weaving Too Wide
Wide weave patterns pull the arc away from the center of the joint for too long. This melts the outer edges before the puddle can flow back. Tighter, more controlled weaves or switching to stringer beads reduce this risk significantly.
How to Identify Undercut Before It Becomes a Bigger Problem
You can usually spot undercut with a visual inspection and a flashlight, but marginal cases need a gauge to confirm depth. Most welding codes set a maximum allowable undercut depth, often around 1/32 inch (0.8mm) for critical structural work, though your governing code may differ.
Run your finger or a weld undercut gauge along the toe of the bead. If you feel a visible groove or dip below the surface of the base metal, mark it for repair. On critical joints, don’t rely on eyeballing it a dial-indicator undercut gauge gives you a precise depth reading in seconds.
Catching undercut early matters because shallow undercut is a quick grind-and-reweld fix. Deep undercut that goes unnoticed until a load test or field failure costs far more time and money to correct.
Step-by-Step Fix for Weld Bead Undercut
Fixing undercut follows a consistent sequence: clean, grind, reweld, and blend. Skipping any step usually means the repair fails inspection or creates a new defect.
Step 1: Clean the Area
Remove all slag, spatter, and mill scale from the affected section before doing anything else. Contamination trapped under a repair weld causes porosity, and porosity is arguably a worse defect than the undercut you’re fixing.
Step 2: Grind Out Sharp Notches
Use a grinding disc to smooth the undercut groove into a shallow, rounded profile rather than a sharp notch. Sharp corners concentrate stress, and welding directly over one without grinding it out often traps that stress concentration under the new bead. A light pass is enough you’re smoothing the transition, not removing large amounts of metal.
Step 3: Reduce Amperage for the Repair Pass
Set your machine 10-20% cooler than your original pass. The goal is to deposit filler metal into the groove without melting the edges further and creating a second undercut on top of the first.
Step 4: Run a Slow, Controlled Stringer Bead
Move at a steady pace and hold a slight pause at each toe of the weld. This “dwell” lets the puddle catch up and fully fill the groove instead of bridging over it. Bridging over a repair leaves a hidden void, which shows up as a failure point later.
Step 5: Blend and Inspect
Once the repair pass cools, grind it flush with the surrounding weld and base metal, then inspect visually or with dye penetrant if the application calls for it. A properly blended repair should be indistinguishable from a defect-free original weld.
Technique Adjustments That Prevent Undercut From Returning
Permanent defect prevention requires eliminating the underlying technique habits that cause undercut in the first place. By mastering three core variables torch angle, travel speed, and heat input you address the root cause of joint erosion before striking the arc. When working with materials prone to heat buildup, such as mild steel or aluminum, maintaining an optimal push angle prevents the arc force from digging grooves into the base metal, while a controlled travel speed ensures the puddle completely fills the joint edges. If you find yourself consistently repairing weak edges, revisiting fundamental setup principles like how to MIG weld will reinforce precise puddle manipulation, stabilizing your arc voltage and guaranteeing structural joint integrity on every pass.
Use a Slight Push or Drag Angle, Not Straight-On
Hold your torch or electrode at roughly 10-15 degrees off perpendicular, in the direction of travel. A straight-on 90-degree angle concentrates heat directly under the arc with nowhere for the puddle to flow, which is a common trigger for undercut on both vertical and horizontal passes.
Match Travel Speed to Puddle Behavior, Not a Fixed Number
Watch the puddle instead of counting a set speed in your head. If the puddle looks glassy and is closing in behind the arc smoothly, your speed is correct. If you see a trailing groove that doesn’t fill, you’re moving too fast for the current heat input.
Dial In Heat for the Position, Not Just the Material Thickness
Vertical-up and overhead welding need less amperage than flat position welding on the same material, because gravity is already pulling the puddle where you don’t want it. Many welders set their machine once for material thickness and forget to adjust it as the position changes, which is a frequent cause of undercut on multi-position pipe or structural jobs.
A Less Common Fix Worth Knowing: Adjusting Your Stick-Out or CTWD
One angle that gets skipped in most guides is contact-tip-to-work distance (CTWD) in MIG welding, or stick-out on flux-core. A stick-out that’s too long drops your effective voltage at the arc, forcing you to compensate by cranking up your machine settings which then overheats the edges and causes undercut anyway. Keeping stick-out consistent, typically 3/8 to 1/2 inch for most GMAW applications, lets you run correct voltage without hidden overheating at the joint edge. If you’ve already tried slowing down and lowering amps with no luck, check your stick-out before changing anything else.
When Undercut Requires More Than a Simple Reweld
Deep undercut on structural or pressure-critical joints sometimes needs engineering sign-off rather than a field repair. If the groove exceeds your code’s allowable depth, or if it runs along a significant length of a load-bearing seam, treat it as a structural concern, not a cosmetic one.
In these cases, document the defect, consult your welding procedure specification (WPS), and get approval before grinding and rewelding. Repairing without following the correct WPS can void certification on code work, even if the finished weld looks fine.
Frequently Asked Questions
Can you weld over undercut without grinding it first?
You shouldn’t. Welding directly over undercut without grinding traps sharp notches and any contamination under the new bead, which often creates a hidden defect worse than the original undercut. Always clean and lightly grind the groove before running a repair pass.
Does undercut always mean the weld will fail?
Not always, but it does weaken the joint and creates a stress concentration point. Whether it fails depends on the depth of the undercut, the load the joint carries, and the applicable code’s tolerance. Shallow undercut on a low-stress joint may pass inspection, while the same depth on a structural or pressure joint may not.
Is undercut more common with MIG or stick welding?
Both processes produce undercut, but the causes differ slightly. MIG undercut often comes from excess voltage or wire speed mismatch, while stick undercut more often comes from high amperage or an incorrect arc angle. Fillet welds in either process are especially prone to it.
What’s the fastest way to reduce undercut on vertical welds?
Lower your amperage for the position and add a brief pause at each side of your weave pattern. The pause lets the puddle fill the toe before gravity pulls it downward. Combining this with a slower, more controlled travel speed usually resolves vertical undercut within a pass or two.
Can undercut be detected without special equipment?
Yes, for surface-visible undercut, a flashlight and a visual check catch most cases. For precise depth measurement, especially on code work, a dedicated undercut gauge gives an exact reading instead of a guess.
Conclusion
Weld bead undercut comes down to heat, speed, and angle working against each other, and it responds well to a straightforward fix: clean the area, grind the notch smooth, reweld with slightly reduced amperage, then blend the repair flush. The real long-term solution is adjusting your technique arc angle, travel speed tied to puddle behavior, and heat matched to welding position so you stop creating undercut in the first place. Combine that with routine visual checks after each pass, and undercut becomes a rare problem instead of a recurring one.